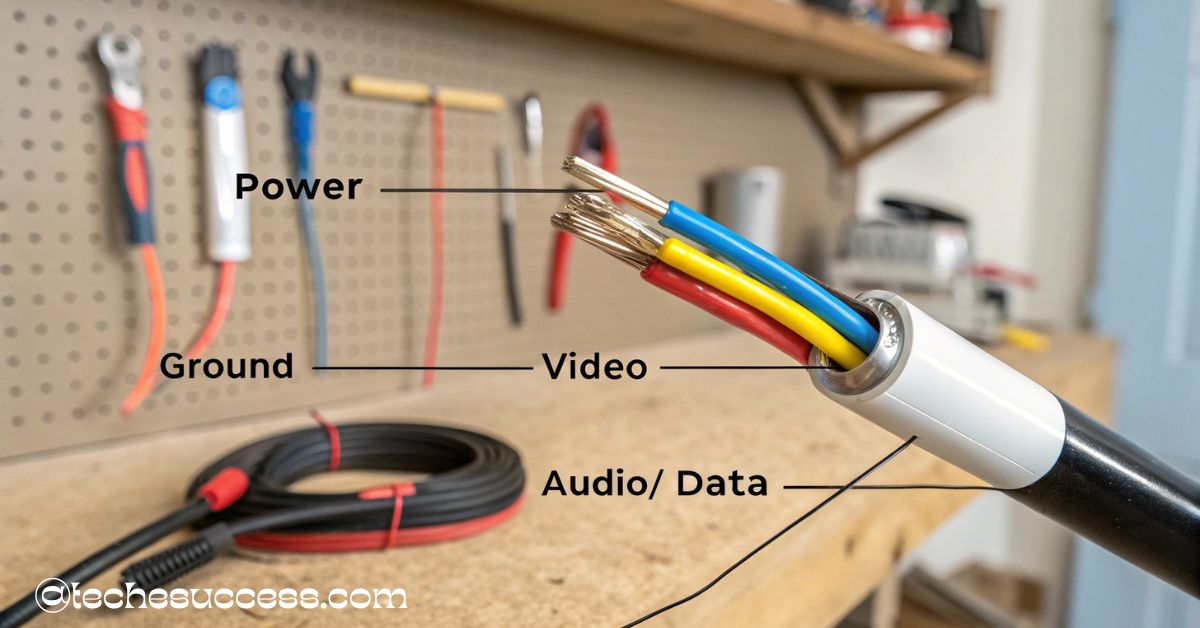
The 4 wire color diagram splicing security camera wires simplifies CCTV installation by identifying power, ground, video, and audio/data lines. Proper splicing ensures safe connections, clear footage, and long-term reliability. Follow the color code to avoid signal loss and wiring errors.
“Stay tuned with us—we’ll continue to explore more insights and step-by-step guidance about 4 wire color diagram splicing security camera wires…”
Why Wire Colors Matter When Splicing Security Camera Wires
Color-coded wiring is the foundation of an efficient and reliable camera system. These color standards prevent mistakes during installation and maintenance, ensuring each wire is connected to its proper function.
Avoiding Signal Loss and Power Failures
When wires are incorrectly connected or spliced, the entire security camera system becomes vulnerable to signal degradation or total failure. For example, swapping the power and video wires might not just disrupt your feed—it could damage the hardware. Following the 4 wire security camera wiring color code helps ensure that power, video, ground, and audio/data lines each perform their roles correctly, maintaining clean video transmission and consistent power flow.
Making Future Maintenance Easier
Imagine trying to repair or upgrade your security camera system months or years later. Without a consistent wire color scheme, this becomes frustrating and time-consuming. By using standard wire colors during splicing, any technician or DIYer can quickly understand the wiring layout. It also helps identify and replace faulty wires without affecting the rest of the system.
Understanding the 4 Wire Color Diagram for CCTV Cameras
The 4 wire color diagram splicing security camera wires black layout is common in analog CCTV systems and combines power, video, ground, and audio/data into four separate wires. Recognizing these colors makes wiring easier and safer.
Red Wire – Power Supply
The red wire is typically used for positive power input, supplying 12V or 24V DC to the camera. This wire must connect to a power source using proper connectors or terminal blocks. Always double-check voltage compatibility to avoid burning out the camera’s internal circuits.
Black Wire – Ground Connection
Black is universally accepted as the ground wire. It completes the electrical circuit and is vital for stabilizing current flow and minimizing the risk of electrical shock. Grounding also helps protect your camera system during power surges.
Yellow Wire – Video Transmission
Yellow wires are dedicated to video signals, usually sent to a DVR via BNC connectors. The integrity of this wire determines the clarity and quality of the camera feed. Make sure it’s properly shielded during installation to avoid video noise or interference.
White/Blue Wire – Audio or Data Line
The fourth wire, either white or blue, is used for audio or data transmission, depending on the camera’s capability. In some setups, it allows for PTZ (pan-tilt-zoom) control or audio monitoring. It’s less common in basic systems but essential in more advanced setups.
Types of Cables and Connectors for Security Camera Installation
Choosing the correct cables and connectors ensures seamless performance and compatibility with your security system.
Coaxial (Siamese) vs Ethernet Cables
Coaxial Siamese cables combine RG59 video coax and 18/2 power wire into one jacket. They are popular in analog setups, offering easy dual-function routing.
Ethernet cables (Cat5e or Cat6) are used in IP camera systems. They carry both video and power through Power over Ethernet (PoE), reducing the number of cables needed.
Here’s a comparison chart:
| Feature | Coaxial Siamese | Ethernet (Cat5e/6) |
| Used For | Analog Cameras | IP Cameras |
| Power Transmission | Separate Wire Pair | PoE Compatible |
| Installation Ease | Bulky, Less Flexible | Slimmer, Easier to Run |
| Max Distance | Up to 300ft | Up to 328ft (PoE) |
BNC, RJ45, and RCA Connectors Explained
BNC connectors are standard for analog video. They twist-lock onto the camera and DVR ends, creating a solid signal path. RJ45 connectors are used with Ethernet cables in IP systems. RCA connectors offer plug-and-play options for basic audio or video.
Each connector must match the wire type and gauge to ensure durability and signal quality. Improper connectors often cause intermittent failures or loose connections.
How to Splice Security Camera Wires Safely and Effectively
Splicing is essential when extending wires or repairing damage. Done correctly, it ensures stable connections and long-lasting performance.
Step-by-Step Splicing Process
- Turn off power to the entire system.
- Strip about half an inch of insulation from each wire end.
- Match colors exactly (red to red, black to black, etc.).
- Twist wires tightly together, ensuring no copper is exposed.
- Seal the joint using electrical tape or wire nuts.
- Use heat shrink tubing for added protection.
A clean splice protects against corrosion and signal loss while ensuring safety.
Tips for Weatherproof Outdoor Splicing
Outdoor splices face exposure to moisture, UV rays, and temperature fluctuations. Use waterproof connectors or silicone-filled wire nuts to seal splices. Additionally, always place outdoor splices inside weatherproof junction boxes to reduce the risk of corrosion.
Tools Needed for Clean and Reliable Splicing
- Wire strippers
- Crimping tool
- Electrical tape
- Heat shrink tubing
- Waterproof connectors (for outdoor use)
- Multimeter (to test connections)
Using the right tools not only speeds up installation but also ensures a professional-grade result.
Running Security Camera Wires Through Walls
A neat installation often requires hiding wires inside walls. This not only improves aesthetics but also protects wires from damage.
Planning Your Cable Path
Before drilling, map out the shortest and most accessible route from the camera to the DVR and power supply. Use crawlspaces, attics, or basements to route wires efficiently. Mark entry and exit points to avoid hitting plumbing or electrical lines.
Drilling and Labeling Tips
Drill holes near where the camera will be mounted. Use a drill bit slightly larger than the cable to allow easy movement. Always label both ends of each wire using tags or colored tape to prevent confusion during final connection.
Running Security Camera Wires Outdoors Without Mistakes
Outdoor wiring faces harsh environments and requires added precautions.
Use of Conduits, Clips, and Weatherproof Materials
PVC or metal conduits protect against physical damage and moisture. Use cable clips or ties to secure wiring along walls or soffits. Choose UV-resistant cable jackets to prevent degradation from sun exposure.
Common Outdoor Wiring Mistakes to Avoid
- Using indoor-rated cables outside
- Leaving splices exposed to elements
- Running wires too low, making them prone to damage or tampering
- Skipping grounding, which can cause short circuits during storms
Avoiding these mistakes extends the life of your system and improves reliability.
BNC’s Role in the 4 Wire CCTV Wiring Diagram
BNC connectors are essential for analog video signal transmission, particularly in systems using the 4 wire color diagram splicing security camera wires layout.
Proper Use of BNC Connectors for Video Signal
The yellow wire connects to the BNC connector, which then plugs into the DVR. BNC connectors provide a secure and stable connection, reducing signal loss and improving video clarity. Make sure to match the connector type with the wire thickness and cable shielding.
How to Splice BNC Cables Correctly
Splicing BNC cables requires care. Use a coaxial cable stripper to expose the shield and core. Then, crimp a new BNC head using a compression or twist-on BNC connector. Test the connection with a monitor before sealing everything.
Advanced CCTV Wiring Options
As systems grow in complexity, some installations require more than four wires.
5 Wire Security Camera Wiring Color Code
5 wire security camera wiring color code setups include extra lines for control or audio. These are often used for PTZ functions or advanced alarms. Make sure to use compatible connectors and reference color charts during installation.
6 Wire Security Camera Wiring Diagram
A 6 wire security camera wiring diagram supports additional features like dual audio and control lines. It’s common in mid-level commercial systems. For a complete guide, you can refer to the 6 wire security camera wiring diagram PDF.
8 Wire Security Camera Wiring Diagram
An 8 wire security camera wiring diagram is typically used in IP systems and smart home setups. These often involve Ethernet wiring and additional data lines, supporting functions like PoE, audio, alarms, and sensors.
3-Wire Security Camera Wiring Diagram
A 3-wire security camera wiring diagram is sometimes used in basic or plug-and-play systems. These combine ground, power, and video into a simplified structure but offer limited functionality.
Final Tips for Installing and Splicing Security Camera Wires
Small details can make a big difference when setting up your system.
Label Everything and Test Connections
Before sealing wires inside walls or conduits, test every connection for video feed and power. Labeling saves time during installation and is a huge help if repairs are ever needed.
Keep All Wires Secured and Protected
Loose or dangling wires can wear out or disconnect. Use cable clamps, zip ties, or clips to hold wires firmly in place. Protection from physical damage and environmental exposure ensures long-term performance.
FAQ’s
1. What is the color code for security camera wires?
The standard 4 wire security camera wiring color code is Red for power, Black for ground, Yellow for video, and White/Blue for audio or data.
2. What are the color codes for reversing camera wiring?
Typical reversing camera wire colors are Red for power, Black for ground, and Yellow for video. Some models may also include Blue or Green for trigger or control functions.
3. Can you join camera wires?
Yes, you can join (splice) camera wires using proper techniques—match wire colors, twist tightly, and seal with electrical tape or waterproof connectors for safety and signal integrity.
4. What are the colors of the wires on the Bunker Hill camera?
Bunker Hill cameras usually follow standard colors: Red (power), Black (ground), Yellow (video), and White or Blue (audio/control), but always refer to the specific model’s manual.
5. Can I mix wire colors if I label them properly?
Yes, but it’s not recommended. Standard colors help others understand your system quickly.
6. What happens if I reverse the power wires?
Reversing power polarity can damage your camera. Always double-check before connecting.
7. Are BNC connectors better than RCA for analog systems?
Yes, BNC provides a more secure connection and reduces interference compared to RCA.
8. How far can I run a 4-wire CCTV cable?
Up to 300 feet for analog signals; use amplifiers or converters for longer distances.
9. Do I need a license to install security camera wiring?
In most areas, no license is needed for residential installs, but check your local codes.
Conclusion
Mastering the 4 wire color diagram splicing security camera wires may seem technical, but once you understand each wire’s role and follow best practices, the process becomes manageable. From choosing the right cables and connectors to safe splicing and secure installation, every step matters. With a bit of planning and attention to detail, your security system will be reliable, neat, and long-lasting.
Also Read:
- 22fps camera caugt bullkt that went by trumps head!
- Boykeep Smart Camera Review: Top Features, Price & Comparison!